Slow Roasted Turkey with Garlic and Herbs
When talking about poultry, the leg I am referring to is the drumstick and the thigh connected– the whole leg. That said, some butchers or turkey farmers refer to this cut as a “turkey quarter,” which also makes sense. Either way, it’s all dark meat, and it’s fabulous.
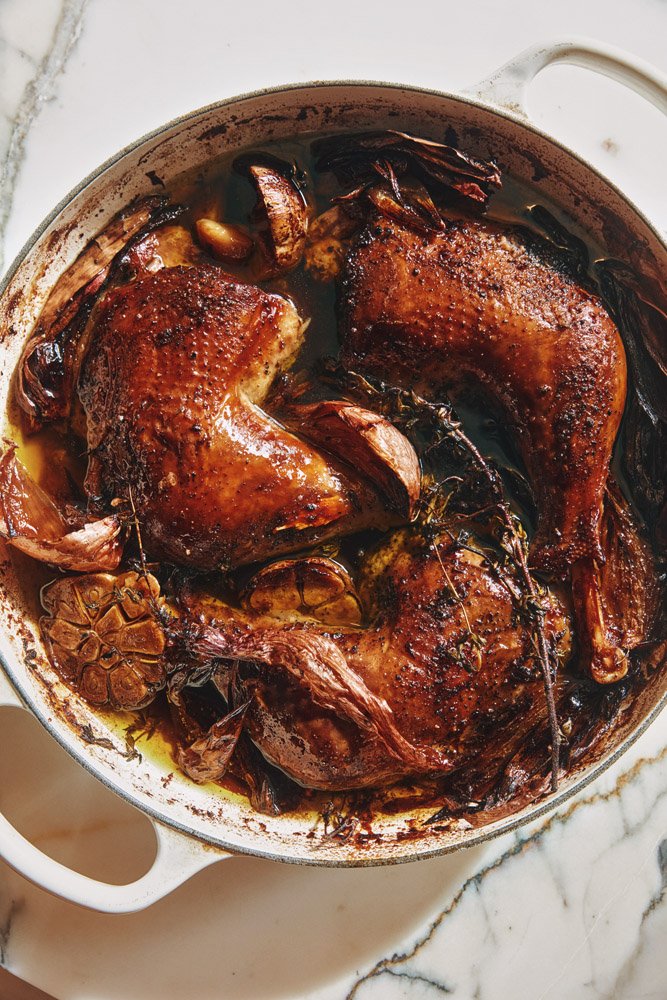
Despite the “dark meat,” being considerably richer than, say, a breast, turkeys are still notoriously lean, which is why even the legs really love to be slow-cooked in abundant fat: here, equal parts olive oil and chicken fat. Use 100% olive oil if you can’t find chicken fat; use duck or goose fat (in place of chicken fat) if either are available. You could stop there, but the garlic, shallots and herbs slowly infuse the fat as it cooks the bird, lending what can only be described as undeniably Thanksgiving-y flavor.
YIELD — 6–8 servings
Ingredients
4 lbs. whole turkey legs, drumstick and thigh connected, a.k.a. 2 turkey quarters
2 tablespoons kosher salt, plus more
1 tablespoon coarsely ground black pepper, plus more
1 tablespoon light brown sugar
2 cups chicken fat, duck fat or olive oil
2 cups olive oil
2 large heads garlic, halved crosswise to expose the cloves inside
2–4 large shallots or small red onions, quartered lengthwise
A few sprigs herbs, such as thyme, sage, or oregano
Directions
1. Preheat oven to 275°F. Combine 2 tablespoons salt, 1 tablespoon black pepper and all of the brown sugar in a small bowl. Place turkey in a large baking dish, and season on both sides with the salt mixture. Let sit at least an hour, and up to 24 hours (While the legs can be seasoned and roasted the same day, even several hours of pre-roast dry brine will do lots of favors for both the texture and flavor of your turkey—I wouldn’t skip it).
2. Drain any liquid that’s come off the turkey, and pat dry a little. Scatter garlic, shallots, and herbs around the turkey, and cover with chicken fat and olive oil. Season again with salt and pepper (just like your pasta water should be seasoned, so should the fat you cook in), and cover with foil.
3. Place in the oven, and roast for three hours (at this point your turkey will be cooked through and mostly tender). Remove foil, use a spoon to baste some of the fat on top of the exposed parts of the turkey, and continue roasting until the skin is a deep golden brown, another 45–60 minutes.
While the turkey is almost guaranteed to be cooked through and tender at this point, if you’re not sure, know that the meat should fall apart with the suggestion of a poke (I like to check the top of the thigh, under the skin), the skin shrinking off the drumstick.
4. Remove from the oven, and let cool slightly. To serve, of course you don’t need to do any carving—the bones will slip right out, and the meat should effortlessly shred, not unlike slow-cooked pork or short ribs. But if so inclined, you can also pull the meat apart into large, gorgeous chunks and arrange on a serving platter, and spoon a little of the fat and the hunks of caramelized garlic over it.
DO AHEAD: Turkey can be seasoned 2 days ahead. Turkey can be roasted 3 days ahead; stored wrapped and refrigerated. Rewarm in a 275°F oven until warmed through, 30–40 minutes.
LEFTOVERS: Head to the leftovers section for ways to repurpose this specific turkey. Otherwise, on its own, it’ll keep in the fridge submerged in some of the fat it was cooked in for at least 5 days. The leftover fat ( with all the bits strained out) will keep in the fridge at least a month.